Tile shower tray: detailed construction instructions
The stores have a huge selection of pallets made of various materials, but not always the opinion of manufacturers may coincide with the consumer. In this case, the capacity for collecting water in the shower box can always be made with one's own hand. However, for an optimal result, you need to know the rules of the structure. Do you agree?
We will talk about how to make a pallet from a tile for a shower cabin. We will show you how to choose the shape and dimensions of a home-made structure, ideal for an equipped hygienic room. The construction of such a useful homemade product will simultaneously solve several important problems.
The content of the article:
Pallet Tools
Any preparatory work begins with the acquisitionconsumables and tools. Work is faster and easier when everything is at hand, and you don’t need to run to a specialized store every now and then.
So, for the implementation of the project, we can not do without:
- Capacities, where we will mix concrete for screed, mortar for bricks and adhesive base for tiles.
- Short rule for screed andhalf.
- Building level.
- Trowel and spatulas - rubber and gear for tile glue.
- Screwdriver - cross or straight, depending on the type of fastener hats by which the ladder is assembled, andscrewdriverif it will be necessary to assemble the formwork and make struts.
- Drills withmixing nozzleif too lazy to mix the solution manually.
- Ceramic disc grindersif you have to cut a brick, and a disc for metal, if you have to cut a metal mesh and fittings.
- Grouting.
- Mallet (rubber mallet).
- Brushes for applying mastic.
Surely almost everything necessary is already in the arsenal of the owner of the house, otherwise the missing tools will either have to be purchased or borrowed from relatives, friends or neighbors.
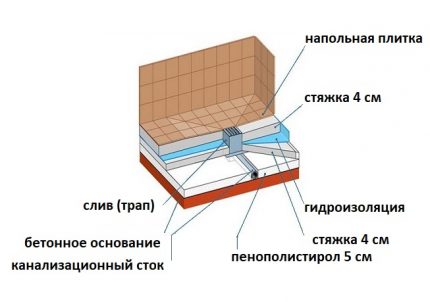
What else will you need to work?
When all the necessary tools for work have already been assembled and a diagram of the future pallet has been drawn, you can proceed with the purchase of construction and consumables.
So, during construction you can not do without:
- Gangway or drain system.
- Bricks. Whensolid concrete Fillings will need to be stocked with formwork boards. In the case of the construction of the side of the pallet in the form of an ideal quarter of a circle, it is better to formwork fromFiberboard.
- Mayakov.
- Waterproofing material for the bathroom and a roller for applying it.
- Bitumen, roofing felt or a dense plastic film - depending on preference.
- Styrofoam - if insulation is required.
- Sand and cement M400, or a universal mixture of M150, or M200.
- Plasticizers and hydrophobicwater repellent additives.
- A metal mesh for reinforcing the screed, if its width does not exceed 10 cm.
- Reinforcement, if the side is reinforced concrete, and not of brick.
- Waterproof tile adhesive and crosses.
- Tiled or mosaic tiles, requirednon slip varieties.
When everything is ready, you can safely proceed to the construction of a shower tray.
Step-by-step instruction on the arrangement of the pallet
If the floor is concrete, as is the case with multi-apartment buildings, or there is already a concrete screed, this is good. You can immediately begin to erect the sides and waterproofing, after carefully thoroughly cleaning the surface.
If the base is imperfect, before there was a wooden floor, etc., before the direct construction of the structure, it is imperative to pour the screed.
Stage # 1 - surface preparation
For the manufacture of a mixture for screed suitable ordinary mortar made on the basis of cement M400 and mixed in a ratio of 2 parts of sand to 1 part of cement.
In order not to bother with measuring the ingredients for the solution, you can simply purchase a universal mixture M150 or M200.
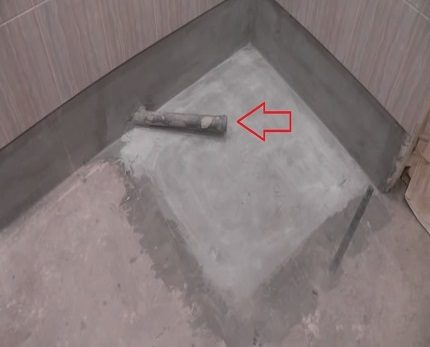
Stirred with a drill withmixing nozzle in the right proportions indicated on the bag, and the solution is ready.
Actions should be performed in the following order:
- We make layering for drain into the sewer pipe in advance, so that later you do not have to crumble a new concrete slab with a perforator.
- We expose the formwork the shape and size of the future pallet, not forgetting that its future sides will also be located on this pallet. Therefore, when marking, it is worth bearing in mind the thickness of the tile and the thickness of the layer of tile glue (from the front and the outside, and therefore double) and the width of the brick. If the screed will be poured around the entire perimeter of the bathroom, for example, in the case of installing a warm floor or major alteration of floors, formwork will not be required. The sides of the pallet can initially be erected on the screed.
- If the base is 7 cm wide, install a metal mesh 3 cm above the floor. If the screed is wider than 10 cm, reinforcement is not needed. The stove will come out of excellent fortress anyway.
- Preparing a mixture according to the given proportions. In the case of expanded clay concrete, expanded clay is added to the mixture at the rate of 1 × 1, that is, in a bucket of mortar - expanded clay bucket.
- On the inside of the formwork and on the walls put marks by level at the height of the future screed.
- Fill the screed. Align with a small rule,one and a half or trowel.
Now we wait until the screed seizes and dries. It will be possible to return to the continuation of work no earlier than on the third day after pouring the screed.
Whensolid concrete mixes the weight of the flooded draft slab measuring 90x90 cm and a height of 10 cm will be at least 180 kg. Therefore, for residents of multi-storey buildings, it is best to dilute the concrete with expanded clay. Expanded clay slab will come out 4 times easier.
Stage # 2 - waterproofing and installing the ladder
Waterproofing can be of two options - roofing material or plastic film. Some people prefer pouring or coating with bitumen.
The effect of any of the selected materials in the case of a shower cubicle for private apartments and houses will be on top.
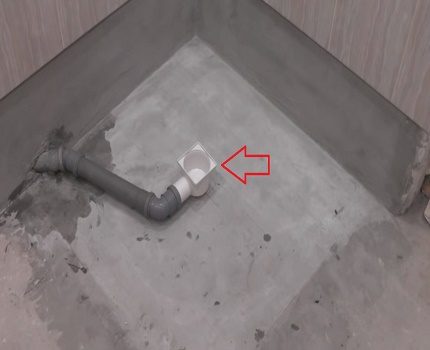
If you want to insulate the future pallet, now is the time for this. Immediately make a reservation that it is hard to choose polystyrene foam, and it is advisable to lay it immediately on a rough screed along the perimeter of the side.
In the case of insulation shower drain partially recessed in polystyrene foam. We took this moment into account, now we boldly undertake the installation of the selected and prepared ladder. All details of which must be assembled perfectly.
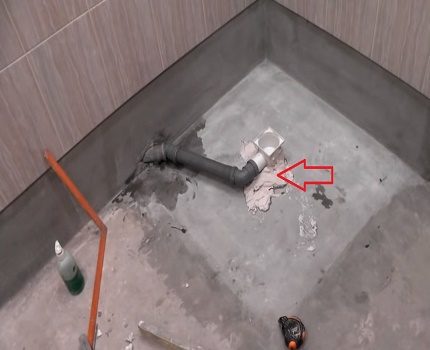
If during the installation of the ladder you did something somewhere or didn’t assemble it correctly, then in order to eliminate the malfunction, you will have to “drill” the whole pallet with a puncher again, and the ladder will most likely have to be thrown out and put in a new one.
Stage # 3 - erection of the sides
It is best to erect the beads immediately after the cushion has solidified and the gangway has been installed. In the future, they will serve as a natural border for waterproofing and insulation, as well as formwork for the main screed.
Now do the calculation. We calculate what height the side of 1 brick will be laid out on the side edge:
- a layer of mortar over the rough screed (under the brick) - 5 mm;
- brick itself - 120 mm;
- a layer of tile adhesive - 5 mm;
- tile - 3-5 mm.
It turns out that the height of the brick side will be 135 mm, at the maximum value.
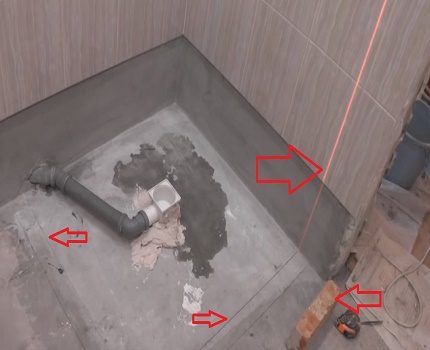
But we must take into account that from the inside of the cabin we still have to lay:
- waterproofing layer - 1-2 mm, if it is mastic and roofing material;
- insulation - 50 mm, if it is expanded polystyrene;
- screed - from 4 to 10 cm, depending on the height of the drain device of the ladder;
- tile adhesive - 5 mm;
- tile - 3-5 mm.
Then the internal arrangement of the pallet will come out with a height of 82 mm at the maximum values. Now we subtract 82 from 135 mm, we get 53 mm. This is exactly the height of the side should be relative to the inner finishing surface of the pallet. In fact, this height is slightly larger than a matchbox.
If it seems small to someone, you have to, armed with a grinder, cut blocks of the right size from bricks and lay them on top of a solid brick. In the calculations, it should be taken into account that in this case, another layer from the solution will be added to the size of the cut block.
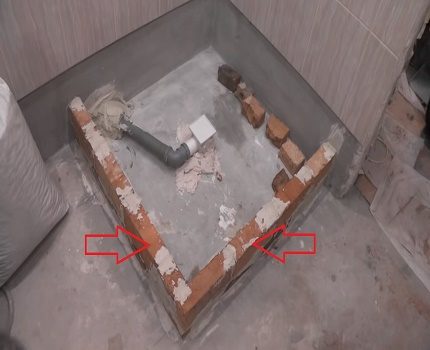
In order to start laying out the side of the brick, you should prepare a mixture of water, cement and sand in a ratio of 1: 1: 3 with the addition of plasticizers and hydrophobic additives.
Brick is better to use red M-125. It has the highest moisture resistance of all varieties. When laying, it is advisable to use a special reinforced mesh.
Upon completion of the masonry, in order to proceed to the further stages, you will have to wait a couple of days until the mortar completely sets and dries.
Stage # 4 - filling the main screed
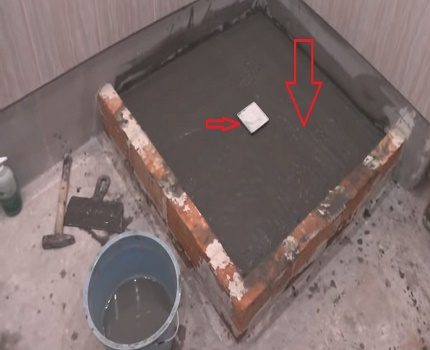
In the course of pouring the screed, we pay attention to the fact that the upper grate of the ladder should be located above it at the height of the layer of glue and tile.
This stock is made so that in the future, when laying the tiles, the drain grate could go with it “to zero” or slightly lower, depending on the design features of the ladder itself. After erecting the main screed before the next steps, you will have to wait again until the concrete hardens.
Stage # 5 - re-waterproofing
Repeated waterproofing should not be neglected. Spending money and time on the purchase and application of waterproofing mastic, you protect yourself from leaks and moisture accumulation in the structural elements.
This means that you will not be scribbled at you by the neighbors from below, whom you constantlyflooding, and you yourself will be spared from eternal dampness and the appearance of fungus in the bathroom.
After applying the mastic on the entire surface of the screed, on the inner and upper parts of the sides, you should again wait until it dries. Only after complete solidification on it, you can begin laying tiles or tile mosaics.
Stage # 6 - Tiling
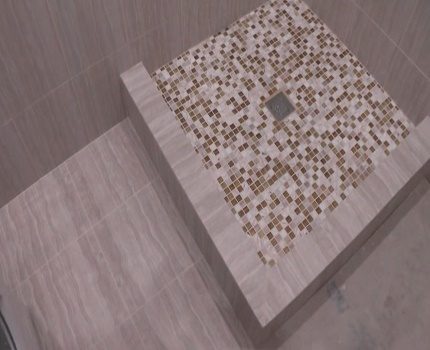
Any options will look great, but those with a side lined with tiles and the inside of the pallet with tiled mosaics will be especially spectacular. In any case, it all depends on the choice of the owner.
So, in the case of facing work, the actions are as follows:
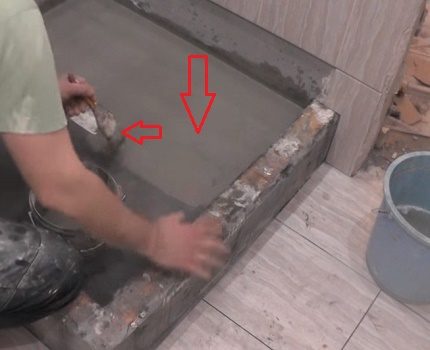
- We prepare the adhesive mixture based on the proportions and consistency specified in the instructions for the purchased variety of tile glue. Some manufacturers produce glue that can cure very quickly, so do not immediately knead a whole bucket. At first, especially if you have never done this before, you should try kneading in small batches.
- If you are faced with laying tiles for the first time, then know that this is not as difficult a job as experienced "tilers" and "tilers" like to tell about it. The main thing is patience and accuracy. The very first thing to know finishing should always start from one of the corners. We collect glue with a trowel, put on the back of the tile, apply it to the pallet from the corner, press.
- Each tile must be checked for level. In the case of a slightly tilted bottom, the level itself on the horizon is not so critical. The main thing here is that all the tiles are in the same plane. For alignment is a rubber mallet. For perfect evenness of tile laying - special crosses located between the tiles at the corners. Each of the tiles should fit snugly to the stuck sides of the crosses.
- If the tiles at the edges are not suitable in size, you will have to cut them off with a grinder equipped with a ceramic circle.
- Upon completion of laying the lining the next day, remove the crosses, clean the seams from excess glue and grout with a specially prepared grout with a rubber spatula.After the excess grout, the seams are removed with a slightly damp sponge.
- The joints where the plane of the pallet converges with the walls and sides, as well as the corners of the sides, it is desirable to seal up with a transparent sealant.
- Only after the grout and sealant has completely hardened is it recommended to wash the laid tile.
Often, craftsmen prefer to apply glue directly to the surface, rather than to the tile itself. You can try this way and that. Do as you like more and as you prefer. But do not forget that there should be so much glue under the tile so that there is no empty space under it that is not filled with the glue mixture.
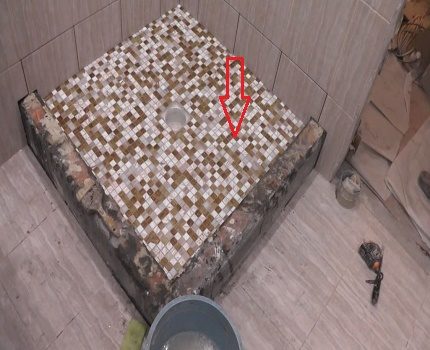
Stage # 7 - hardening and drying
It is advisable to start installing the fence and taking a shower only after the newly made pallet has thoroughly grasped and, as they say, “reaches”.
To speed up this process, ensure that the bathroom temperature is between 25-30 ° C, good air circulation and lack of humidity. Doors in the room are preferably kept open. In a day or two, it will be possible to install a fence and wash.
Features of the construction of the sides
If it was decided to build a pallet with a solid reinforced concrete side in the form of a quarter circle, then some features should be taken into account.
In this case, the construction of the sides begins with the stage of pouring the rough screed under the future pallet. Under it, you will have to initially make a high formwork, so that it subsequently serves also as the outer side of the formwork for the side.
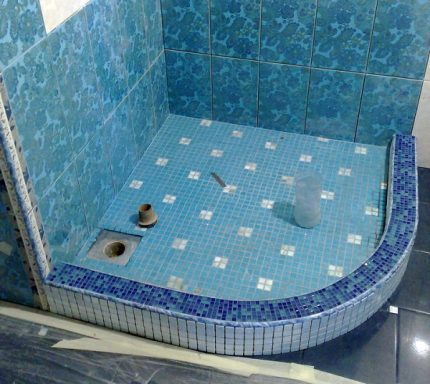
Immediately after pouring and leveling the base at its perimeter, 4-5 sections of reinforcement with section 10 should be repaired. These will be ribs for longitudinal reinforcement of the side.
So that they do not have to be cut off by the grinder later, adjusting in height, it is better to cut them a little less than the height of the future side initially. Its height can be calculated in the same way as in the case of a brick side.
Formwork is best made fromFiberboard. The hardboard bends perfectly, and reinforced with props and struts will be as strong as a board. It is best to make corners of bars under it as stops, which will provide the future side with a stable vertical level.
After the screed hardens on the reinforcement rods that have hardened around the perimeter of the base, a pair of 8-row reinforcement rows should be tied. It can be solid, bent according to the necessary parameters of the circle, reinforcement or pieces, which need to be connected vertically sticking reinforcement rods longitudinally with knitting wire.
After fromFiberboard with the help of spacers, the inner wall of the formwork of the side is constructed, after which it can be poured.
Conclusions and useful video on the topic
The whole process of constructing a shower tray is presented in the following video:
As you can see, the construction process is not particularly complicated. The main thing is to develop a project and not be too lazy to bring it to mind. Well, the tools. If they are available at home or they can be borrowed from a neighbor, in a word, you will not have to spend money on their purchase.
All the construction of the pallet will cost the owner many times cheaper than the same acrylic pallet of dubious production would cost, which, most likely, after a year and a half will have to be thrown into the trash.
The resulting shower tray withtrim made of tiles, made with one's own hand, and even in some ways even slightly imperfect, will always serve faithfully not years, but decades.
Please leave comments in the box below. Ask questions and post photos on the topic of the article. Tell us about how you built your own shower box or your acquaintance.

 The device of a shower cabin without a pallet: detailed assembly instructions
  How to assemble a shower tray: mounting options for typical options
  Repair of a shower cabin: how to repair popular damage to a shower cabin with your own hands
  Installing a shower tray: installation instructions
  Tile shower cubicle: step-by-step construction instructions
  Connection of a shower cabin to the sewerage and water supply: step-by-step instruction
  How much does it cost to connect gas to a private house: the price of organizing gas supply
  The best washing machines with dryer: model rating and customer tips
  What is the color temperature of light and the nuances of choosing the temperature of the lamps to suit your needs
  Replacement of a geyser in an apartment: replacement paperwork + basic norms and requirements
I hired a person to make a pallet with a cladding of small square tiles. Still, the work requires painstaking. It is necessary that the construction does not let water pass, etc., it is better if the pros do it. I want to warn everyone who is also going to finish with tiles or mosaics: it is not very convenient. Slides strongly underfoot and slowly heats up, I had to lay a rug on top. As a result, regretted that he chose such a pallet.
There is only one difficulty in creating a tile pallet: it is necessary to provide waterproofing, that is, all materials must be waterproof. The first time I did without mastic, but even so for about 3 years the pallet lasted, then it began to leak. Otherwise, all the work is the same as when laying tiles: it requires accuracy and perseverance, well, and a little experience in this matter. Without experience it will be difficult.