Mounting the tank to the toilet: a detailed description of the installation process

Prefer to save the family budget by creating comfort in the house with your own hands? You must admit that many work is quite within your power to do it yourself without inviting unfamiliar plumbers, electricians, and locksmiths for this. You decided to mount the tank to the toilet, but you never did, and you don’t know where to start?
We will help you understand the essence of the matter - the article describes in detail the process of installing various drain tanks. Features of fittings in hinged, built-in and familiar plumbing tanks of the compact type are considered. Mounting and assembly is accompanied by step-by-step photo materials and explanations.
To help home plumber, we picked up videos with video recommendations for assembling fittings, installing a tank and replacing a toilet bowl. Thanks to a detailed description of the installation process, this task will be within the reach of anyone who knows how to use simple home tools in practice.
The content of the article:
The subtleties of choosing a toilet
We will not delve into the design nuances - the selection of colors and shapes of a faience friend, as well as other necessary plumbing, each carries out to your taste. But to understand exactly what type of tandem "toilet bowl - flush tank" will be the most convenient for your own installation, it is simply necessary.
Consider the most common types of drain tank installation type.
Compact - a drain tank, which is located directly on a special ledge of the toilet bowl and, after installation, is practically integral with it. For those who can not boast of a plumbing education, such a layout scheme is most preferable, since in this case the assembly is as simple as possible.

Built-in (hidden) a tank for a suspended or floor toilet. It is installed in a special niche or hides behind a false wall. In principle, the installation itself is not too complicated, since the kit comes with a special support frame - installation, to which the main parts are attached.
And yet, for her precise fit, some additional skills and increased attention are needed. In addition, then it will also be necessary to cover all equipment with decorative materials, which also requires additional forces and means.

Mounted or standalone cistern. Attaches separately from the toilet to the wall and connects to it using an optional overflow pipe.
The length of this pipe can be quite short, which allows you to use modern fittings (internal filling) of the tank and use a small lever or familiar button to drain the water instead of the Soviet chain with a handle. However, the installation of such a tank requires a lot of effort, skills and time.

It should also be noted that for financial costs the first option will be the most profitable - everything you need is already included in the package. It is only necessary to check the presence of all components.
But in the third and especially in the second case, funds are needed for additional parts, and it is far from the fact that they can be purchased in the same store where the main plumbing is selected.
Before buying a new plumbing tank for replacement, carefully examine its condition. It is possible that enough drain tank repair. For its implementation, in most cases, the capacity will also have to be removed and then put back.
Preliminary work before installation
Before proceeding directly to installation work, it is necessary to prepare both the place of action and the object of the application of force, in this case, a drain tank with all auxiliary elements.
Moreover, the preliminary work is carried out in several stages (although not all of them are mandatory - it all depends on the type of equipment selected).
Step # 1 - Dismantling the Drain Tank Before Replacing
Before installing a new drain tank, you must first dismantle the old one. And if your toilet is a sample from the time of the Soviet Union, it is better to enlist the help of an assistant - it will not be easy to turn a cast-iron tank and knock down rusted bolts.

The disassembly itself takes place according to the following scheme:
- Turn off the flow of water to the tank (block the central valve).
- We remove the remaining liquid from it, that is, we simply drain the water.
- We disconnect the container from the pipes - water and bypass, if it is (it is at this stage that the assistant is very useful).
- We unscrew the fixing bolts and remove the old structure. We perform these operations with caution so as not to drop the heavy tank and not damage the tile floor or toilet bowl.
- We clear the vacant space for a new installation. We try to completely remove rust and cement residues, leaving only a flat, free from defects surface.
After carefully performing all of these steps, you can begin the preparatory work.
Step # 2 - preparing the place and materials
Before mounting a new tank, check the condition of the rest of the plumbing and communications.

What to look for:
- Bowl of the toilet. Even if you change only the tank itself, you need to make sure that the main element of the "tandem" is installed correctly. To do this, check with the help of the building level whether it is evenly located - with significant deviations, the roll is better to eliminate. Such thoroughness is needed when installing a compact toilet, since due to the tilt, the tank in this system may not work correctly. At the same time, it is worth examining the connection of equipment to the sewer.
- Failed communications. At this stage, the location and condition of the cold water supply pipe, which then needs to be closed, should be clarified. At the same time, consider how long the flexible hose should be for connecting the tank to the water supply, as well as the need to include a ball valve or additional outlets for supplying water (for example, to a washing machine) in the system.
- Cistern. Make sure that the container itself is free from defects; all component parts are available and ideal for installation. The length of the mounting bolts and the flexible water hose should be sufficient for a reliable connection, and all gaskets and couplings should be sized. It is also worth checking the completeness and performance of internal fittings.
Now make sure that all the necessary tools and materials are at hand - so you spend less effort and time on the installation process.

For work you will need:
- To install a compact toilet bowl tank, only wrenches are needed - a flat spanner or a ring spanner and a cylindrical socket. Moreover, the carob can be replaced by interchangeable or even use a pair of pliers, and the end can be either monolithic or composite. These keys are used to tighten the mounting bolts.
- When installing the remaining types of drain tanks, you need to add another tape measure with a building level and a pencil (mark the location of the holes for the fasteners), as well as a drill (or punch) and a hammer for installing dowels under the bolts.
- Connecting the overflow pipe additionally requires an adjustable spanner for the diameter of the coupler.
- To ensure the watertightness of the joints, it is worth stocking up with silicone sealant and sealing tape, and for the prevention of corrosion of metal parts in contact with water (most often the bolt heads) - and special grease.
Before starting installation, be sure to shut off the water with a central valve.
Features of the fittings of the main types of tank
Almost always, when you independently mount the drain tank, you have to manually install the mechanism for collecting and lowering water - internal valves.
Fortunately, for most modern designs this process is intuitive and not difficult, and the instruction is present in any case. But just in case, we will consider a simplified scheme, paying attention to various nuances of fastening.
Type # 1 - Internal Compact Toilet Mechanism
AT fittings compact toilet most often there are only two main elements - the inlet and outlet valve. An inlet (float) device is a part that connects to a water pipe, which serves to collect fluid and adjust its level.
Installing it takes just a few steps:
- Before mounting the mechanism in its internal cavity at the external outlet, you must first install a filter to clean the incoming water or make sure that it is equipped with the manufacturer.
- The device is attached to the bottom wall of the tank (according to the attached instructions), putting on the inside a mandatory gasket, and on the outside securing with a special nut included in the kit.
- The external outlet is equipped with a thread, to which, after installing the tank in place, a flexible water supply hose is connected.
The exhaust valve or drain siphon can be of two types - single-level or two-level. And if at the opening of the first variety all water is discharged into the toilet from the collected tank, then in the second case you can decide for yourself - to lower the entire supply or only half of it.
The device itself can be divided into three parts: the connecting bowl, the main mechanism and the operation button.
Installation is carried out by analogy with the intake design:
- The lower part is made in the form of a kind of supporting bowl, which is placed in the tank drain hole. It also uses a rubber (or silicone) gasket and fixing nut.
- After securing the tank, the main piston system is added to the bottom part by a simple turn with a snap.
- The last step (after installing the cover) is to install the button assembly.
As already mentioned, when choosing a compact system, you can be sure that all the necessary nuts and gaskets are included in the kit. But in the event that you are not satisfied with the quality of materials, which are often equipped with plumbing from the middle or “economy” class, you can replace some parts.
For example, take reliable silicone gaskets instead of “native” rubber or stainless bolts.

But such an upgrade should be carried out before installation, following the model of reconciling the correspondence of new parts to the main components of the mechanism.
Type # 2 - fittings of a mounted drain tank
Most often, the difference between the internal structure of the autonomous tank and the compact is the conclusion intake valve on the side wall using a lever drain assembly. Because of this, both the appearance of the float device and the trigger valve system change.

However, the installation itself does not become more difficult from this - it is enough to strictly follow the instructions.
Type # 3 - mechanism of the integrated drain tank
A big advantage when buying a wall-hung toilet with a built-in tank is the lack of work to install the fittings in the flushing tank. You get a fully assembled mechanism, you just have to attach a double button to the front panel. But we will consider this step in more detail when describing the process of installing the tank.
Basic installation work
After preparatory work and assembly of the inside, you can proceed with the installation of plumbing. But since you need to install each type of toilet bowl in your own way, then choose from three different step-by-step schemes that is most suitable for your case.
Instruction # 1 - fixing the tank to the compact toilet
The easiest to use is the installation scheme of a flush tank to a compact toilet shelf. The installation and fixing process includes a number of traditional actions:
Here, a complete set of tools is not needed, and you can even do without an assistant.
- The necessary reinforcement components are inserted and fixed into the inner part of the tank (this process is described above separately).
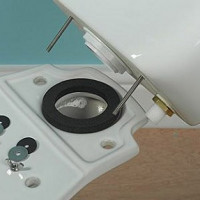
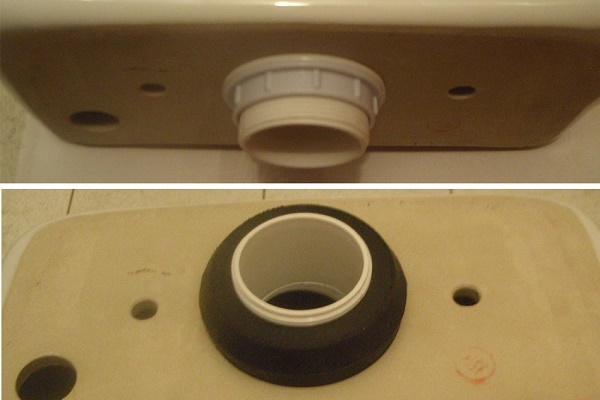
- On the shelf (a special protruding part) lay the seal. With proper tightening of the fixing bolts, the gasket seals the connecting hole for draining the water, however, for reliability, it can additionally be placed on silicone glue.
- The drain tank is installed on the toilet so that the gasket is exactly under the bottom of the exhaust valve (drain), and the holes for the connecting bolts in the tank and toilet match.
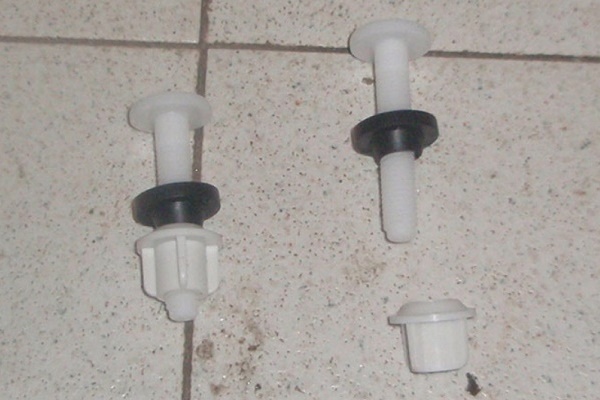
- On the bolts put on plastic washers and rubber cone-shaped gaskets (with the cone down), then they are threaded into both holes, after which they pull the second set - flat rubber gaskets and plastic washers - and nuts are manually tightened.
Since it is not possible to tighten the nut tightly with your hands, the tools are used - wrenches. From above, the bolt head is tightened with a socket wrench, while holding the nut with a spanner or union nut from below.
When tightening the bolts, do not be particularly zealous - the stronger the load on the gasket, the shorter its service life. In addition, if the bolts pressure on the ceramic of the tank is too strong, cracks can form.
The next stage of installation is the perfect alignment of the installed tank using the building level, for which, from the right side, tighten or loosen the fasteners.
After completing work with bolts, their heads are closed with plastic nozzles or treated with anti-corrosion grease. After making sure that all fittings are fully installed inside the tank, configure it. Top cover and a button to drain the water.
Lastly, the protruding part of the inlet valve and the water pipe are combined with a flexible hose with embedded rubber gaskets. For greater reliability, you can additionally apply a sealing tape or plumbing tow.
It is not advisable to use glue in this case - what if you have to change the hose? At the final stage of the installation, they check for leaks and the adequacy of the operation of the tank drain mechanism. To do this, the water supply to the drain tank is turned on.
If everything is in order in the area of the gasket, at the junction of the flexible hose with the water pipe and the inlet valve, a test discharge of water is carried out. Then again they make control of possible leaks. At the end of the test, the system "toilet - drain tank" is ready for use.
The first stage is the assembly of internal fittings.

An important point - when both devices are fully installed, their moving parts should not touch each other.
Then it was the turn to directly mount the tank on the toilet shelf.

At the very end, we replace the tank cap and push-button assembly connected to the valve outlet valve.

If you have not yet encountered plumbing problems face to face, then you should learn from more knowledgeable people.
Instruction # 2 - installation of an autonomous tank
As already mentioned, installation mounted drain tank more complicated, so consider hiring an assistant.
Basic installation steps:
- A bypass pipe is connected to the toilet and the wall of the tank is marked on the wall, after which the pipe is removed from the toilet until work is completed with the tank. Moreover, at least approximately calculate the height of the discharge structure, that is, the length of the connecting element, you need in advance.
- At the selected height, the location points of the fasteners are calculated, aligning them with a tape measure and level.
- According to the marks made, a drill or a perforator is used to drill holes and put dowels.
- Fittings are inserted into the tank and the bypass pipe is connected, not forgetting the gaskets.
- The assembled tank is attached to the wall by tightening the bolts into the prepared holes.
- The pipe is connected to the toilet, and the tank to the water supply, taking care of the tightness of the connections.
The use of various washers, gaskets and other sealing elements is no different from those of the previous installation method.
Testing of installed equipment is also carried out according to the same scheme.
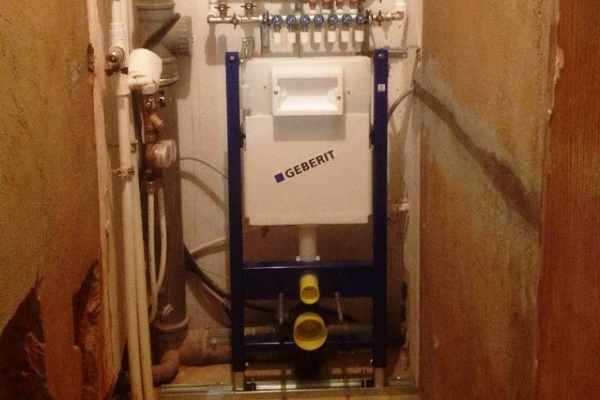
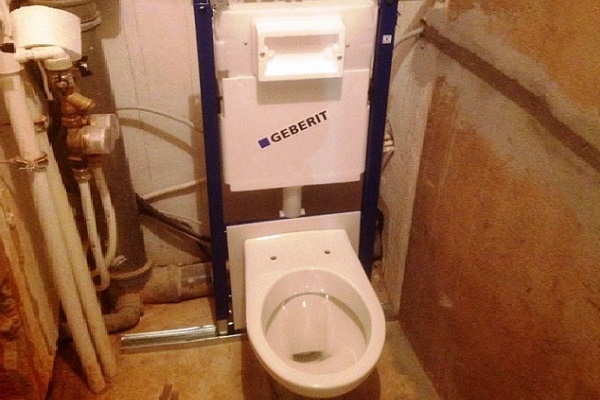
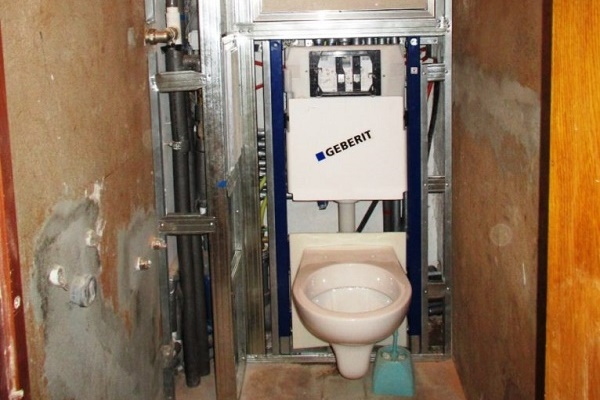
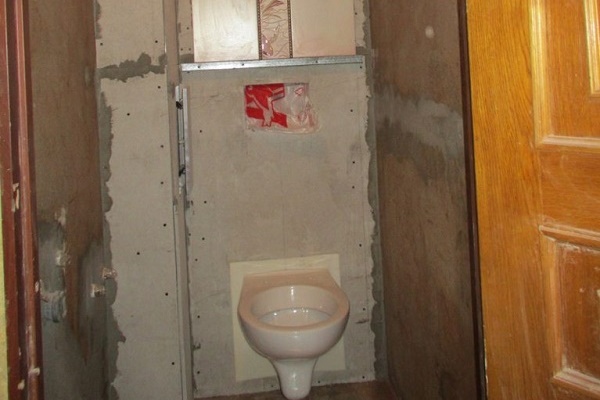
Instruction # 3 - build-in type assembly
The main difference between the tandem of the hanging toilet and the built-in tank from previous designs is the presence of a single installation system - a frame frame on which all components are installed.
If, in addition to replacing a damaged tank, it requires repair installation, it must be carried out before covering the plumbing support structure with plating.
The general installation diagram is as follows:
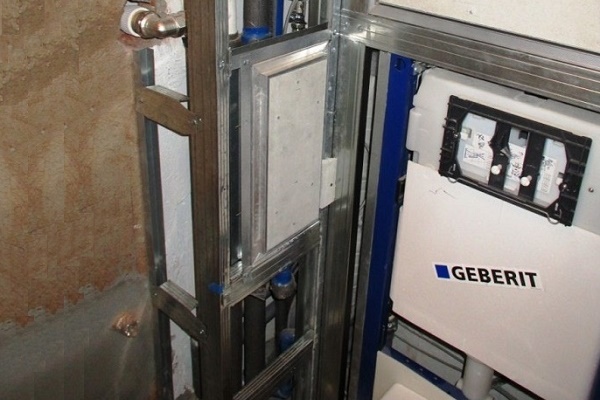
- By alternating the test connection of the main elements (tank, adapter to the outlet of the sewer and others), the most convenient positions of the frame frame relative to the walls, floor and sewer pipes are calculated.At the same time, the clarity of the horizontal and vertical bars is necessarily verified with the help of a level.
- After the final formation of the installation system and fixing the exposed frame sizes using the fixing mechanism (or ordinary bolts) on the wall and floor, the points of location of the fasteners are noted.
- The perforator makes the necessary holes. For various finishing materials, special drills are used - for example, separately for concrete, brick or ceramic tile.
- The mounting frame is securely fastened to the wall and floor with bolts on the dowels or anchor bolts.
- On the frame already fixed to the surfaces, all the structural elements are installed - from the tank to the sewer siphon.
- The drain tank is connected to the water supply.
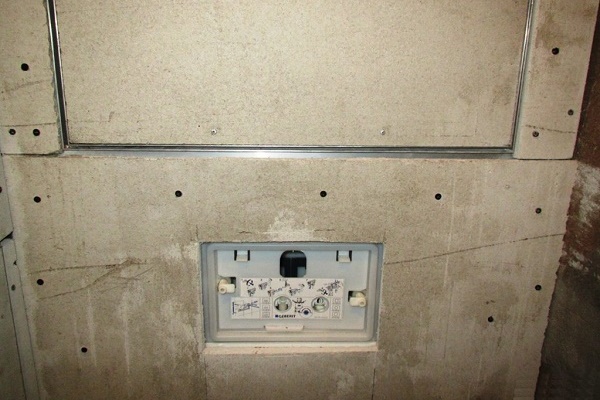
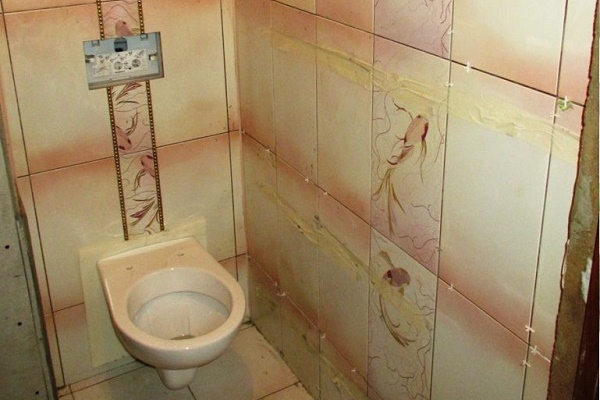
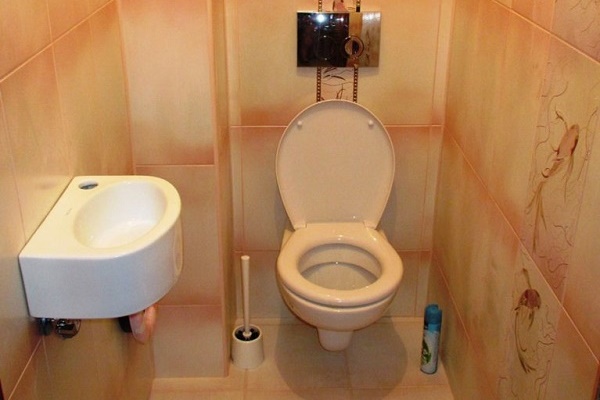
- The frame is covered with finishing materials (this can be gypsum board with a subsequent decorative coating, and various types of panels).
- In the holes carved in the decoration, they put a double button for draining and hang the toilet.
But, despite the universality of the proposed scheme, the priority should always be the instruction for your system - take the trouble to study it before installation, because non-compliance with this rule can lead to expensive errors.

Conclusions and useful video on the topic
In order to make the installation of fittings in the tank more understandable, watch the video tutorial, which discusses the assembly and configuration of several types of valves:
We suggest watching a video where a full installation of a compact toilet occurs by a professional plumber with an explanation of the nuances for beginners:
Here is one of the installation instructions for the installations. See how honed your actions should be:
As you can see, some systems can be mounted by a person who is absolutely not involved in plumbing. But if you understand that you do not have enough experience or time for repair work, and the purchased kit cost a considerable amount, it is better to invite a knowledgeable specialist.
Please write comments in the block below. We are interested in your stories about how you fixed the flushing tank to replace the seal or completely changed the capacity. Ask questions if you have any questions while reading the text.
 Replacing the toilet bowl: how to remove the old tank and put in a new one
 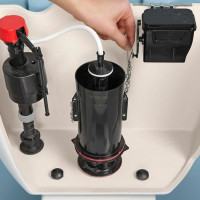 Fittings for the toilet flush tank: how the spillway device works and works
  Do-it-yourself toilet drain tank repair: instructions for fixing typical breakdowns
  Lid for a bidet for a toilet: types, description of the principle of work and tips for choosing
 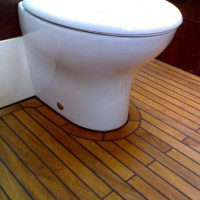 Installing a toilet on a wooden floor: step-by-step instruction and analysis of installation features
 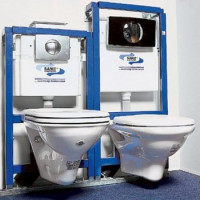 Securing the toilet for installation: step-by-step installation instruction
  How much does it cost to connect gas to a private house: the price of organizing gas supply
  The best washing machines with dryer: model rating and customer tips
  What is the color temperature of light and the nuances of choosing the temperature of the lamps to suit your needs
  Replacement of a geyser in an apartment: replacement paperwork + basic norms and requirements
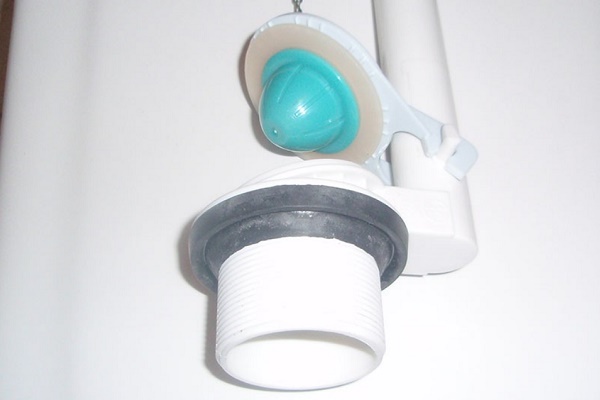