Manual drilling of wells for water: how to drill water intake manually

Not all owners of suburban areas are willing to lay out large sums to attract drillers to construct a water well. However, the convenience of using your own water intake is difficult to overestimate. You can save by constructing a water source with your own hands. How to make it?
You will learn all about how manual drilling of wells for water is carried out from our article. We will tell you how and in what way the work is done, what novice drillers will need to implement the idea. Based on our recommendations, you can easily drill and equip the mine.
For independent masters, we brought and disassembled all manual drilling techniques, explained in which cases they should be used. Attached are diagrams of drilling rigs and shells available for self-manufacturing, posted photo selections and video instructions.
The content of the article:
Types of wells and their features
Own water source is an excellent opportunity to provide yourself and your loved ones with clean life-giving water and satisfy household needs. By drilling and well completion water supply can be solved for several decades to come.
The choice of the method of drilling and the amount of work to equip the well depends on the type of hydraulic structure.
Abyssinian type well
If the water on the site is supposedly located at depths of 10-15 meters, then it is more profitable and easier to build an Abyssinian well. This type of hydraulic structure uses an aquifer located above a waterproof clay layer. The aquifer is fed by the infiltration of precipitation and the waters of nearby reservoirs.

A relatively shallow narrow borehole is a column of thick-walled pipes of VGP with a diameter of 50 - 80 mm. A special filter is arranged in the lower, very first link of the column by drilling holes from the pipe walls.
Pipes perform the function of the barrel, the Abyssinian well-needle does not require additional casing. It is not drilled, but immersed in the ground by driving.
Compact size abyssinian type water intake allow you to place it on almost any free place in the house territory. The most common way to break through this type of hydraulic structure is by impact drilling.
Features of sand wells
With a depth of the aquifer up to 30 - 40 meters, common in loose, incoherent sediments, a sandy structure is constructed aquifer. It is called that because it extracts water from water-saturated sands.

The aquifer of the well on the sand is located only three to four tens of meters from the surface. And in order to reach it one does not have to go through hard - rocky and semi-rocky rocks. Therefore, manual drilling of a sand well will not be difficult if one of the methods described below is applied.
Deep artesian well
But planning to drill an artesian well, you can’t do it yourself. Artesian water is distributed along cracks in impermeable rock and semi-rock formations at a depth of about 40-200 meters.

To determine the depth of the water they should focus on the data of hydraulic structures of this kind, drilled not far from the upcoming work site.
Since the artesian well is able to provide water to several sites at once, it is convenient to order drilling services in a fold. This will significantly save on drilling and arranging a source of water supply.
Self Drilling Methods
In order to choose the best for you personally drilling method, you must first study their specifics and understand what kind of tool is needed, whether it will be possible to drill with your own hands.
Manual auger method
Auger drilling is one of the most common and available methods. It is effective in the construction of wells whose depth does not exceed 40 m.

The essence of the method is that the screw, like a corkscrew, is screwed into the ground. As they penetrate into the soil, a helical rod destroys the layers, and its metal blades carry the spent earth to the surface.
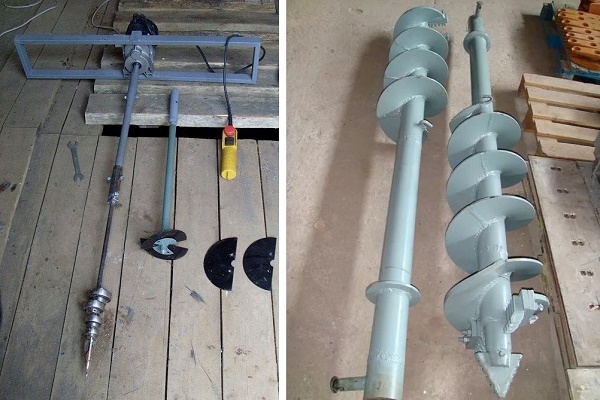
Screws used for manual drilling of wells are of two types:
- Rods, cutting blades to which are welded at right angles.
- Structures for which the blades are welded at an angle of 30-60 °.
The design of the second embodiment is more convenient in operation. Due to the location of the blades at an angle, the crushed soil does not fall into the well, but is completely removed to the surface.
To facilitate manual labor and speed up the process, you can use small-sized screw installations.

Small screw augers operate on the same principle as a manual drill, but are driven by an electric motor.
It is possible to drill a shallow well to take water to irrigate the garden without drilling toolusing a garden drill. True, for casing the walls, pipes will be required from which the development shaft is assembled, and metal pipe-rods required for building.
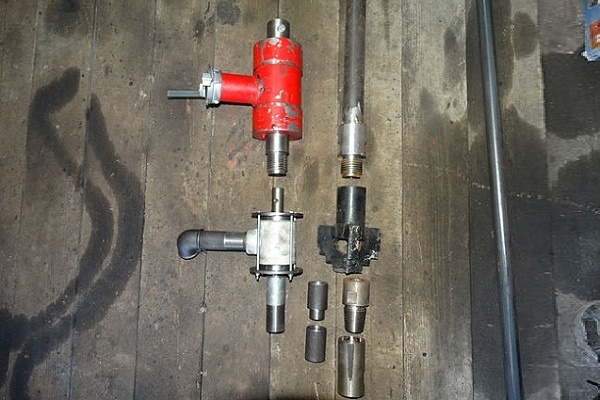
Core drilling technology
Core drilling is performed using a special tool in the form of a pipe equipped with a crown. The specifics of drilling and the diameter of the pipe, which does not exceed 160 mm, allows you to work fast enough. For the day of work, depending on the density of the rock, you can walk up to several tens of meters.
With the help of the attachment unit located in the upper part of the core pipe, one and a half meter rods are built up as the tool deepens. The build-up is carried out in stages, forming a technological column from a projectile with rods.
The crown is made of durable metal. The edges of the crown are sharpened so that its incisors easily cope with dense rocks. The shape and size of the crowns used is determined by the physical and mechanical characteristics of the rock.

When dealing with superhard rock, a chisel is first used before immersing the pipe. Then, with the help of a crown, a borehole is drilled, and the sludge clogged in the core pipe shell is raised to the surface.
In the process manual drilling a casing string is installed in the core method to strengthen the walls of the structure in the trunk during drilling. To facilitate the process of penetration into the projectile periodically, clean water or clay solution is supplied.
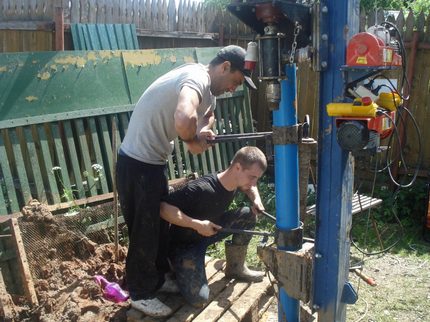
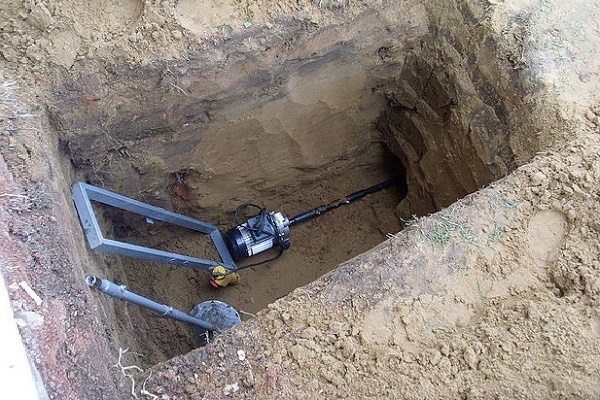
Shock-rope method
The method involves breaking soil by lowering a heavy drilling tool from a height of two meters.
For this purpose, a drilling structure is used, the main elements of which are:
- a tripod that is placed above the drilling site;
- block with a winch and cable;
- driving glass attached to the end of the cable.
The use of a winch allows you to reduce physical activity, and the use of a rotating motor shaft with a gearbox - to automate the process.
A driven glass made of a metal pipe should have a well-sharpened cutting edge that is capable of breaking even hard rocks.To break excessively dense soils, an additional steel rod is used as a weighting agent for the glass, fixing it just above the drilling structure. Loose breeds extracted by bailer.

The glass is freed from the soil captured by it through its bottom, tapping the walls of the shell with a sledgehammer. The cleaning of the flap is carried out through the technological hole located in its upper part.
The work is performed in the following sequence:
- In a chosen place, dig a hole 1x1 meter in size with a depth of 0.5 meters.
- A garden drill is installed at the right angle in the center of the pit. By turning the tool around its axis, deepen it into the ground. As necessary, the screw rod is increased by a pipe, fixing it by means of a bolted connection.
- After the appearance of wet sand, the drill is removed. Instead, a specially assembled casing construction is installed in the hole, which is hammered with a sledgehammer.
- The rock collapsed during the installation of the casing is removed by the bailer. Each time a projectile, when introduced into the formation, captures and holds part of it.
- As the casing is deepened, it is increased by another segment of a similar diameter. The segments are screwed or welded together to obtain a single tight trunk.
- To deepen the casing, gently twist and listen to the sounds made. A rattle will occur during the friction of coarse sand, rustling - fine gravel, silence - when passing clay soil.
- For drilling loose rocks, such as loose sand, pebble, gravel, a bailer is used. Clay rocks and dense sands pass through a glass.
- After performing a series of successive strokes, a glass or a bailer is lifted to the surface, removing soil from it. After this, the cycle of work is repeated.
As in previous methods, to facilitate the process of manual drilling of a well, clay mixture or water is poured into the hole, and then it is recovered using a special bucket. If noise occurs during drilling, the well should be flooded. If the water leaves slowly, the pipe should also be deepened by half a meter, but if quickly - only 20-30 cm.
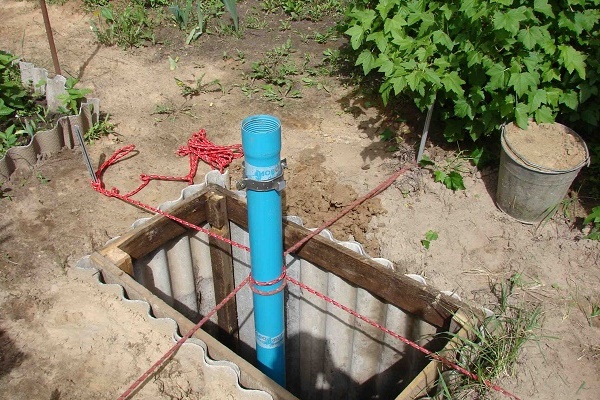
For shallow production, you can easily do it yourself. To do this, you need a pipe with a diameter of 100-120 mm, a metal earring and an eye for fastening the cable, which must be attached to the top of the pipe.
Rotational Impact Method
The main difference of this method is that the rig simultaneously performs both shock and rotational movements. This approach allows you to speed up the drilling process. This method is especially effective if it is necessary to equip a hydraulic structure, if the geological section in the area is heterogeneous.

Shock-rotational and shock-rope methods of drilling are effective when arranging wells in loose soils whose particles are not interconnected. Both methods are suitable for drilling and extracting clay soils: sandy loam, loam.
When sinking in loose rocks due to insufficient connection of soil particles with each other at the stage of well construction, the probability of shedding its walls is high. Therefore, wells on sand are necessarily equipped with casing and filters that prevent the ingress of large inclusions into the extracted water.
Step-by-step auger drilling technology
Among all these methods, auger is considered to be the simplest one. But it should be borne in mind that it is effective only when drilling loose and clay soils.
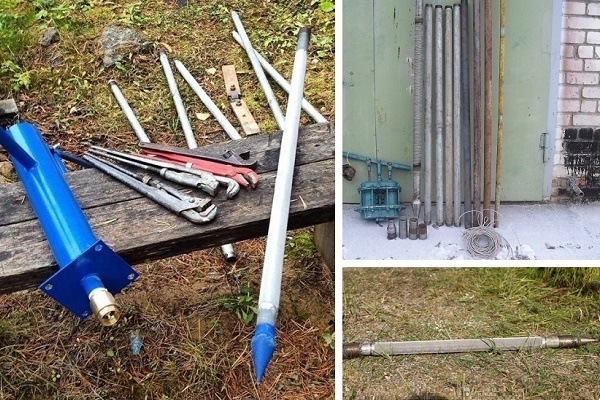
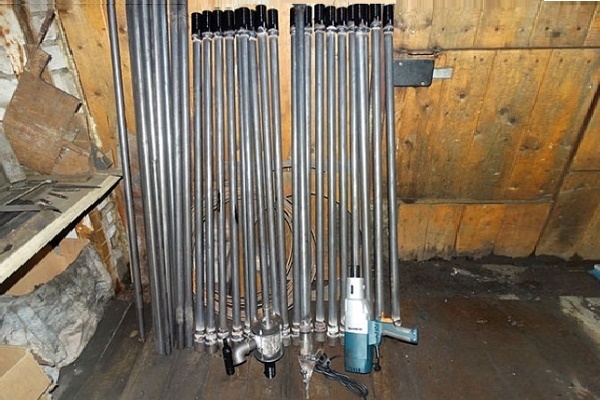
Preparation of necessary tools
Before drilling a well manually, it is necessary to prepare the tools:
- drill or small screw installation.
- drill rig with a winch.
- set of 3-4 rods.
- casing.
If necessary, equip the well at a depth of more than 8 meters to facilitate the immersion of the drill and its subsequent removal from the wellbore equipment is fixed to home-made oil rig.

The size of the tripod must be proportional to the height of the drill string section. To create a structure, the bars are laid in the form of a triangle and fixed by means of a bolt or welding connection.
They make holes for inserting a metal pipe, which will serve as a support. The dimensions of the base are determined only by the stability of the structure.
In the upper part of the structure, a hole is additionally equipped through which the rod will pass.
To protect the wellbore from destruction and shedding of the walls, a casing is installed from pipes that have high bearing capacity to shear and compressive reservoir loads. For work, pipes made of metal, asbestos cement or polymers are used.

When assembling a structure, segments of such elements can be easily screwed into each other without involving additional assembly units.
Making a screw from improvised materials
Material for making a drilling tool, in this case a helical rod, a d100mm pipe may protrude. For this purpose, it is better to use stainless steel pipes with a wall thickness of at least 5 mm.
The upper part of the structure must have:
- on the upper end there is a screw thread on the outside for connection with a bar;
- at the lower end there is a screw auger with at least two turns.
To facilitate the process of turning the drill, a handle 1.5 meters long is welded to the upper cut of the pipe.The transition element between the handle and collapsible rods will be a tee equipped with an internal screw thread.

Rods of 1.5 meters in length are made from a pipe of the same diameter:
- a first rod with an external screw thread at the lower end for connecting the drill;
- all subsequent threaded rods at both ends of the same size.
Couplings must have the same thread specifications. As necessary, build-up designs they are simply screwed to the auger, previously unscrewing the handle.
Some craftsmen use an ice drill as a screw. The knife of the tool in this case performs the function of the cutting blades of the screw. Extension rods are made separately.

Trying to improve the tool, some craftsmen additionally welded reinforced cutters to the factory edges of the improvised screw.
Drilling operations
On the well location they dig a hole with a size of 150x150 cm. It is necessary in order to ensure the stability of a vertically installed pipe. So that the walls of the recess do not crumble, they are strengthened with cuts of the board or pieces of chipboard.

A drill is immersed in the recess and, holding the tool by the handle, they gradually begin to screw into the soil in the clockwise direction. This work is more convenient to do together: the first will scroll the handle of the tool, and the second - to press on it from above.
After passing the first meter, the trunk of the structure begins to form a diameter of at least 12-15 cm. For this, the casing is lowered into the recess. The diameter of the pipe should be slightly larger than the size of the blades of the drill. Further clogging of pipes is carried out in parallel with the deepening of the well.
After deepening the drill by 1.5-2 meters, it will be quite difficult to rotate the tool yourself. To facilitate the work will help the use of pipe wrenches and other gripping devices.

When the moment comes that the drilling tool will be deepened to the full height during immersion, it should be “increased”. To do this, a rod is fixed to it by means of a threaded connection or a “finger-rod” extension.
At this stage, it is important to ensure the strength of the elements. To simplify the task of determining the depth traveled, it is advisable to mark the extended rods.
During the passage of the layers, they continue to form the casing, not forgetting to check the verticality of the trunk. Even minimal curvature can prevent the casing from freely lowering. Therefore, if during the work the drill begins to beat against the walls of the casing string, wooden wedges are hammered to adjust the verticality of the trunk between the soil and the casing pipe.
Work continues until the soil delivered to the surface is wet. This will indicate that the aquifer is already close. To overcome the aquifer, it remains only to go a little deeper.
Casing can be, but it is undesirable to mount, even after completion of drilling. After installing the casing in the fully drilled hole, the collapsed soil will need to be removed again from the well, but the bailer will have to act.

To temporarily fix the casing installed in the drilled shaft, use a device in the form of a clamp equipped with handles. He will not allow the casing to sink into the hole before the next section of the casing is connected.
But it is worth noting that this method is far from the most rational, since it requires a long cleaning of the bottom of the sludge. When forming the column, do not lower the pipes to the bottom of the well. They should not reach the lowest point of the bottom by about half a meter.
To facilitate the drilling process with the help of a screw, experts recommend washing with water from time to time. The jet pumped into the casing cavity will wash the dump to the surface.
Conclusions and useful video on the topic
Well drilling by shock-rope method:
The subtleties of making a screw with your own hands:
For those who want to know how to properly drill a water well manually, we have given proven methods. It is necessary to choose the optimal method of drilling, seriously approach the selection of the necessary equipment, and when conducting drilling, strictly follow the advice of experienced craftsmen.
The result of the efforts will be a hand-made source of water supply, providing clean water for all households.
Want to tell how you drilled a well in your own area? Have questions or interesting facts about the topic of the article? Please write comments in the block below.
 Auger drilling of wells: features of technology and shell for manual drilling and installation
 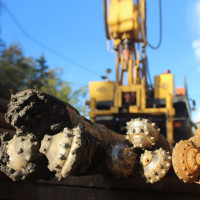 Rotary Well Drilling: An Overview of Drilling Technology and Essential Equipment
 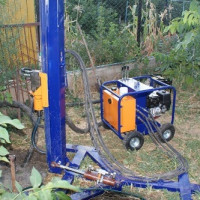 Do-it-yourself water-boring for water wells: a review of technology
 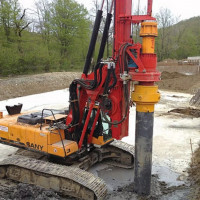 Core Well Drilling: Technology and Work Nuances
 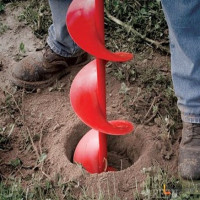 How to drill a well with your own hands: ways to budget independent drilling
 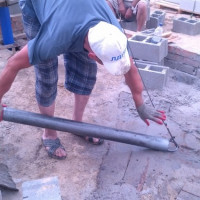 Drilling a borehole: a complete overview of shock-rope technology
  How much does it cost to connect gas to a private house: the price of organizing gas supply
  The best washing machines with dryer: model rating and customer tips
  What is the color temperature of light and the nuances of choosing the temperature of the lamps to suit your needs
  Replacement of a geyser in an apartment: replacement paperwork + basic norms and requirements
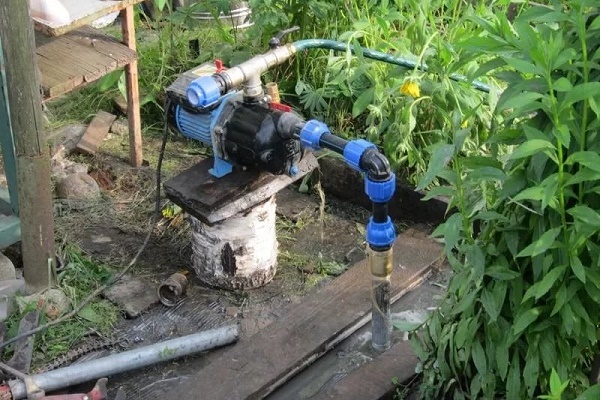
I could not master the drilling of a well in the country myself. I had to look for specialists in this matter with special equipment (for the sake of one well, you will not buy everything you need). We arrived with a small screw installation, I helped. I bought pipes in advance (from plastic - they serve better than metal ones). After drilling, I had to pump out water until it became transparent.
I am in a similar situation now. I need a well in the country, drillers in my region ask for 1,500-2,000 rubles per meter. How much will the total amount come out? I'm even afraid to imagine. On the other hand, the forums scare that self-drilling takes a lot of effort, time and nerves. Should I try or fork out for professionals?
Hello, Alexey. If you need a well for the highest aquifer, then using the services of drillers is not necessary. You can drill a hole on the sand yourself.
This can be done manually, i.e. hand drill. If the cut is predominantly sandy, then it is enough to stock up on a screw. Using such a tool to drill a well up to 30 meters in-house is quite possible. No experience is needed at all. If the depth is within 15 meters, then in a couple of days you will break through, but do not forget to immediately put the casing so that the trunk does not fill up with soil crumbling from the walls.
The difficulty in arranging a well on its own arises just when installing well filters and connecting pumping equipment. If you think you can handle it all, then get down to business.
I also highly recommend reading the article on do-it-yourself well completion. This material is very useful to you.
To equip a well with limestone, it will still be more practical to order drilling work. For rock sinking, hand tools are not enough. More serious equipment will be required, and efforts are needed tens of times more.
There was one case related to drilling. I found specialists in my city on this issue, called, made an appointment. We arrived, everything was as it should, began to drill. When they finally found the water, it turned out to be very dirty, and no matter how much we cleaned it there, it did not get cleaner in the well itself. And the uncles from the company shook their heads, they say they say this is the first time for them, you usually clean it a little, and it is crystal clear.