Homemade heater for the garage: how to make a device yourself

Few people in the construction of the garage provides for the possibility of heating. Therefore, during the operation of the room, you have to heat yourself. Agree, buying heating appliances for periodic use is sometimes costly and impractical.
Some craftsmen make the unit with their own hands, using inexpensive materials. We suggest you familiarize yourself with the three most popular solutions for organizing individual heating.
Before you make a homemade heater for the garage, you need to understand the principle of operation of each unit, its device and study the assembly procedure.
The content of the article:
General guidelines for creating devices
In an effort to save an expense item, many owners, choosing among the options for heaters, are in no hurry to purchase ready-made factory models.
After all, having a desire and having the appropriate skills, a heating device can always be constructed on its own.
At choosing a heater for the garage, which you can do yourself, many are guided by two parameters:
- The heating device should be easily activated, quickly warming the room.
- The device should have a simple design, devoid of complex parts and elements.
- The operation of the device should be carried out at minimal financial cost.
All these requirements are met by the three options described below for homemade heaters that operate from different sources of energy: gas, solid fuel and electricity.

Equally important is the safety of the device. And therefore, regardless of the method of heating in the garage, it is necessary equip ventilation system. After all, reducing the amount of oxygen and the accumulation of combustion products carries a risk to human life.
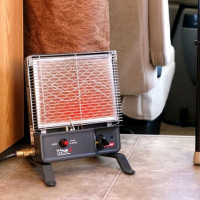
Homemade gas heater
The main advantage of such a model is that its production requires a minimum of parts that can always be found in the economy of any craftsman.

The only minus of the gas heater is the need to ensure adequate ventilation.
Preparation of materials and components
To make a gas heater in the garage, you need to prepare in advance:
- burner with valve;
- tin sheet;
- scissors for metal;
- drill with a thin drill;
- rivets;
- riveter.
For the manufacture of the lattice, a segment of a fine-mesh metal mesh will be required. Well, if you have at hand a regular wire strainer from a colander, it will act as a protective grill.

Collet cylinders are convenient in that when using them, you can not immediately spend all the contents. The presence of shutoff valves allows you to use the device repeatedly.
If desired, the heating structure can be made on the basis of not only disposable cans used to refuel lighters, but also by using a small refilled cylinder.
Cutting blanks and assembling the structure
In the manufacture of the structure, the heater is first fixed to the burner.

Four rectangular ears are drawn in the direction of the four sides of the workpiece deposited on the galvanized sheet. One of the ears should be made twice as long as the rest. Workpieces are cut along the intended contour, trying to make even, barbed-free slices.
The burner is bolted to the cut tin blank with bolts. The ears located on four sides of the billet are bent in the opposite direction and used to fix the strainer.

To attach a second protective mesh, take another piece of sheet metal and cut out of it exactly the same size circle. Elongate the ears necessary for attaching the mesh are attached to the blank.
Having retreated from the edge of the circle by half a centimeter, 10 through holes are drilled along the circumference. From a cut of a fine-mesh metal mesh, a strip is cut whose length corresponds to the diameter of the cut tin blank.

The bent ears of the round tin blanks are fixed to the opposite sides of the mesh strip using a riveter and rivets. When assembled, a cylinder with mesh walls and tin ends should be obtained.
The design, including two grids, is advantageous in that it has an increased heating surface and is equipped with additional protection.
At the final stage, it remains only to turn on the gas water heater and check its operability. The heat produced by this small device will be enough to warm a small room or garage.
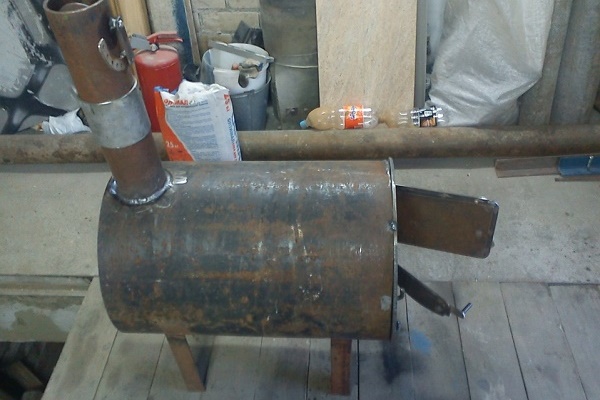
Used cylinder potbelly stove
Potbelly stoves, popular a hundred years ago, today do not give up their positions, acting as the main source of heat in garages and utility rooms. And their main advantage is that they can work not only on wood, but also on everything that burns.

The minimum wall thickness of such structures should be 2-3 mm, but still the best option is 5 cm, so any type of fuel can be used. If we compare the horizontal and vertical models, the first win in terms of ease of loading logs.
Vertical design
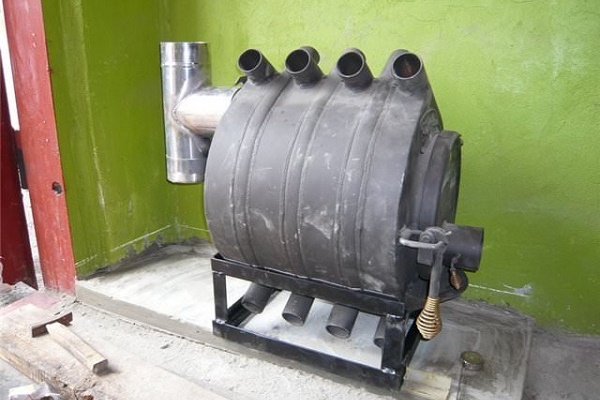
The simplest manufacturing option for a potbelly stove involves the use of a gas cylinder: the housing of the heating structure is already ready, it remains only to equip the compartments for filling the fuel and an ash pan. The height of the cylinder is about 850 mm, the diameter in girth is 300 mm, and the sufficient wall thickness allows you to use any type of fuel.
To build a vertically mounted structure, the cylinder is divided into two parts unequal in volume:
- top - occupies 2/3 of the structure acts as a receiving chamber for laying firewood;
- lower - occupies 1/3 of the structure and is used to collect ash.
For the manufacture of potbelly stoves in the wall of the container for the size of each of the two sections, holes are cut out for arranging the doors. The doors themselves can be constructed from a cut piece of a balloon wall or cut from sheet metal.
On the border between the upper and lower compartment, grates are mounted. But since it is difficult to find a finished cast-iron grate of a suitable size, thick rods are used for its manufacture.

A hole for a chimney with a diameter of at least 150 mm is cut out in the upper part of the cylinder. This element can be welded from a cut of sheet metal. The main thing is that the diameter of the pipe obtained corresponds to the size of the chimney in order to simplify the joining process.
Doors are equipped with locks and attached to the body by welding. If desired, loops can be made from several links of a thick steel chain.

To block the gap formed around the perimeter of the doors, it is better to weld a small side on the outside around the perimeter of the workpieces - a metal strip 1.5-2 cm wide.The finished design can only be connected to the chimney and carry out tests.
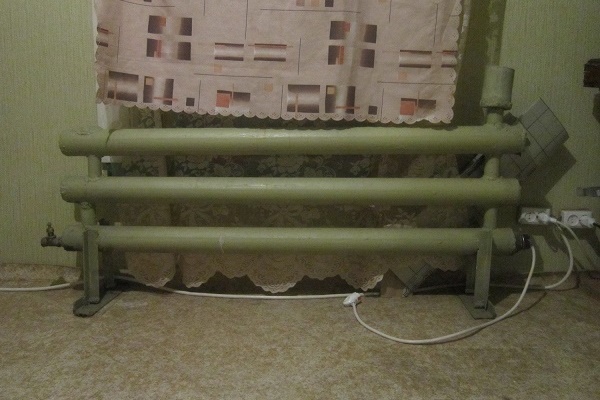
Model with horizontal housing
When the housing is horizontally mounted, an ash collection compartment is welded from below the structure. The main compartment is designed for filling fuel and unloading burnt coal. It is equipped with a chimney pipe with a diameter of 10 cm.

A hole is made in the side wall of the housing for installing the combustion door. Its size should not exceed the diameter of the chimney pipe. The door itself is equipped with a latch and mounted on hinges.
In the wall of the housing, which will be directed downward, make holes. They will perform the function of a grate.
To improve the heat transfer of a hot furnace, the chimney can be made in the form of an elongated broken structure. The main thing with chimney arrangement - avoid horizontal sections. To improve the heating of the room, some craftsmen erect sheet metal casings around the cylinders.
But do not forget that the potbelly stove carries a potential danger. Therefore, the room where it will be installed should be aired periodically.
On our site there are several articles on making do-it-yourself stoves. We advise you to familiarize yourself with:
- Do-it-yourself gas stove from a gas cylinder: diagrams, drawings + step-by-step guide
- Do-it-yourself stove stove: a scheme of a home-made stove for a summer house and garage
- How to make a potbelly stove on waste oil with your own hands: options and examples of making a stove
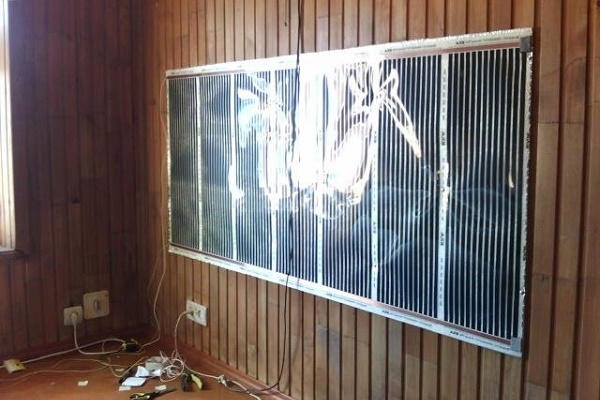
Production of a desktop fan heater
This type of device is a heater and a fan in one person. If desired homemade fan heater can be used as an improvised air conditioner.

This type of heater is convenient in that it allows you to adjust the heating temperature and the rotation speed of the cooler.
Selection of required materials
To create a fan heater you will need the following materials:
- rheostat;
- switch;
- power connector;
- electric wire;
- LED Strip Light;
- 12-volt computer cooler;
- three-volt power supply for 12 volts;
To fix the heating element, two ten-centimeter rods of copper wire with a cross section of 1.5 sq. Mm will also be required.

From the tools you need to prepare:
- jigsaw;
- hammer drill or drill;
- soldering iron;
- hole saw;
- glue for woodwork;
- “Moment” or superglue;
Fine-grained emery paper will also be required to clean the wooden workpieces by removing the burrs along the edges.
Assembly of body parts
The future heater will be in the form of a cube. The body of the device is assembled from wooden boards 9 mm thick.
Need to cut:
- two square blanks measuring 12 * 12 cm;
- 3 parts measuring 10.2 * 10.2 cm;
- two rectangular blanks 12 * 10.2 cm;
- four small rectangles 1 * 1.5 cm in size.
For the manufacture of construction legs from a wooden stick D12 mm, 2 work pieces of 3 cm each are sawn off.

To simplify your task, make paper patterns, the sizes of which correspond to the dimensions of the blanks 12x12 cm. Marking the location of holes is applied directly to the patterns. They are applied to each side and drilled through.
In the workpiece 10.2 * 10.2 cm, having maintained a distance of 2.5 cm from the edge, make a hole D7 mm. On the second workpiece of the same type, two of the same holes are made, having maintained a distance between them of 2.5 cm. On the third workpiece of 10.2 * 10.2 cm, a through hole of D9 cm is made in the center.
In each of the four rectangular blanks measuring 1 * 1.5 mm, holes D5 mm are made.
On the long side of a rectangle measuring 12 * 10.2 cm, departing from the edge by 1.2 cm, make two holes of D12 mm, maintaining a distance between them of 7 cm.

A square blank with a drilled hole of 9 cm is installed inside the housing. After that, the last rectangular part is attached, closing the construction housing. At the final stage, the legs are glued.
Installation of heating elements
A spring stretched between two copper rods will act as a heating element. To determine whether a spring is suitable, it is necessary to connect it to a 12-volt power supply and take measurements using a multimeter.
So to create a warm flow, it is enough if the multimeter reads 2.5 A. With these parameters, a power supply of 12 W will generate about 30 V of heat.
The selected spring is soldered to copper rods, the ends of which are fixed to workpieces with a size of 1x1.5 cm. The assembled structure is glued to the corners of the body. To the ends of the rods soldered bare "tails" of the electric cable. After that, a bar equipped with holes is attached.

Having fixed the cooler inside the case, the same manipulations are performed with a rheostat, a switch and a power connector.
If all structural elements are connected correctly, then when the rheostat is turned on, the blue light will light up on the LED strip. When the switch is turned on, the LED strip will acquire a red tint, which will create a violet color against the background of the main blue. After that, the heater spring starts to heat up.

The assembled structure from the outside can only be sanded and treated with wood wax, or varnished in 2-3 layers.
Thanks to the presentable appearance, such a heater can be safely used not only for heating the garage, but also in the arrangement of living rooms.
Alternative options for economical garage heating are described in this article.
Conclusions and useful video on the topic
Guide to creating a compact heater:
A manufacturing option for a home-made mini-stove:
What type of heating system to use is up to the owner of the room. With due dexterity and the ability to spend a little time, the assembly of any heater for the garage will be done by yourself.
Do you have personal experience in arranging garage heating? Want to share effective methods or talk about a homemade heater? Please leave comments and attach photos of your products - the feedback form is located below.
 How to make a heater yourself: instructing on the manufacture of a homemade device
 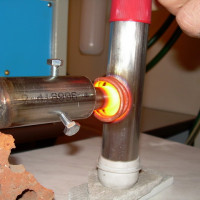 DIY gas heater: instructions to help home craftsmen
  How to make a heating register with your own hands: assembly and installation instructions
 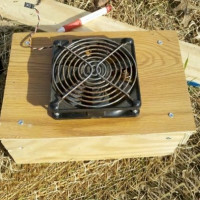 How to make a fan heater with your own hands: a briefing on the manufacture of a homemade device
 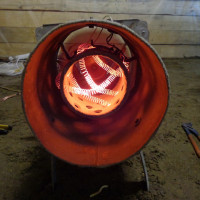 Do-it-yourself electric heat gun: the pros and cons of homemade + assembly instructions
 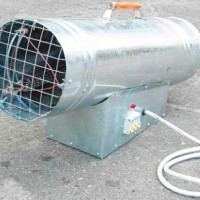 Do-it-yourself heat gas gun: step-by-step assembly instructions
  How much does it cost to connect gas to a private house: the price of organizing gas supply
  The best washing machines with dryer: model rating and customer tips
  What is the color temperature of light and the nuances of choosing the temperature of the lamps to suit your needs
  Replacement of a geyser in an apartment: replacement paperwork + basic norms and requirements
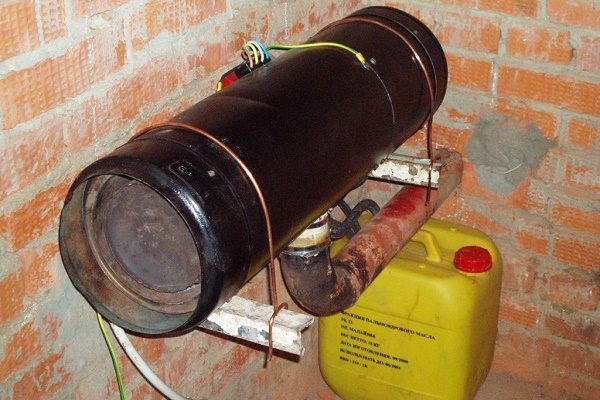
A gas pot made of gas is a good thing. I have personal experience in manufacturing. The gas cylinder was redone under an ordinary stove: he inserted grates, blew it, made a door. But he reduced the furnace chamber, making a partition according to the pyrolysis boiler scheme. In this way, he reduced the combustion chamber of firewood and made a chamber for burning fuel. At the same time, smokiness decreased and the efficiency of firewood increased. I plan to modernize a little more: wrap with a sheet of metal at a distance of 4-5 cm for fire safety and air convection.
How many interesting and simple ideas. I especially liked the design of the heater from a horizontal cylinder, simply and extremely quickly. And the resulting heater does not take up much space. I have already seen such options, but here it is described in detail how to do it easier, besides a minimum of fuss. I just have such cylinders, but smaller in diameter. I’m trying to do something, see what happens.
Yeah, just cut 10 cm sticks and everything will be fine.