How to disassemble a light switch for repair or replacement

A broken switch is an unpleasant situation that requires a speedy solution. In order not to wait for the arrival of an electrician and quickly restore the lighting, it is advisable to be able to repair the device yourself. Agree, this is not only convenient, but also practical from a financial point of view.
The design of the device is not very complicated, so the repair is available to almost any home craftsman who has at least a little experience with electrician. First you need to figure out how to disassemble the light switch, and then determine the cause of the breakdown and eliminate it.
We offer to understand what are the features of dismantling keyboard, rotary and touch models, as well as to find out the most probable reasons for the failure of the switching device.
The content of the article:
How to get started
If the light does not turn on when the key is pressed, the breaker is not always the cause of the breakdown, do not immediately start disassembling it. At first, it does not hurt to check the presence of voltage in the network, as well as the condition of the incandescent lamp. If there is no voltage, most likely the switch is in order.
You need to find out what is wrong with the network (short circuit, blackoutdamage to the power cable, etc.), and repair the damage. With a burnt out bulb it is still simpler - it needs to be replaced. If the network and the lamp are in order, it's time to take a closer look at the switch.
First you need to find on the switchboard the machine through which this particular switch is connected, and put the levers in the “down” position, i.e. disable it. After this, the presence / absence of voltage at the output should be checked using a tester.
The procedure is simple and does not take much time, you should not neglect it, even if there is full confidence that the device is accurately disconnected from the mains.
You can make an assumption about the nature of the breakdown even before the start of the repair. A common problem is the oxidation of contacts inside the device.If the switch does not work only occasionally, most likely the reason is precisely in the bad contacts, which will simply have to be cleaned.
In addition to the “shell” of oxidation, carbon deposits can also accumulate on the metal plate of the switch. It can also be cleaned from accumulations in order to restore the operation of the device.
Serious damage can result from improper installation of the circuit breaker. By inexperience, some amateur masters connect to the machine not a phase, but a zero core. As a result, the switch seems to work, but all the lighting wiring connected in this way remains energized.
It happens that a simple replacement of a blown bulb in such a network can turn into an electric shock. It is enough to correct the circuit so that everything works correctly.

Similar installation errors can lead to the fact that after turning off the machine, the line will still remain energized. This is one of the reasons why you should always check even a disconnected device.
If there is voltage, you need to de-energize the apartment or house. If sparks appear inside the switch each time the switch is turned on and off, this usually indicates that the contacts of the device are of poor quality.
In some cases, it is necessary to replace the entire switch with the same one, only a new one. Usually, the exact same model is selected for replacement, which is suitable for both the socket and the interior.
If for some reason you need to install a different model, you should make sure that the existing opening is suitable for it. Otherwise, you have to re- mount a new socket.
The cause of frequent voltage drops in the network can be not only the general condition of the power supply, but also a large number of powerful electrical appliances that are connected at the same time. In this regard, you can consult with an experienced electrician, you may need to make adjustments to the existing circuit.
How to disassemble the switch
Before disassembling and repairing the circuit breaker, you need to stock up with the necessary tools: a screwdriver with an indicator or a multimeter, insulation tape, sandpaper, a straight and cross screwdriver, marker, pliers, etc.
Also, any container for storing small items, for example, fasteners, will not hurt.

Another useful item when doing such work is a camera or a mobile phone with a camera. The entire process is recommended to be removed. Detailed shots can be especially useful for beginners during reassembly.
The order of work largely depends on type of light switch.
Removing keyboard devices
Step 1. Dismantling a one-, two- or three-key switch begins with disconnecting the keys. Usually, each of them needs to be pry off with a screwdriver or other similar device and simply removed. Some manufacturers make small protrusions or notches on the keys to facilitate dismantling.
Step 2. Carefully remove the decorative frame. To do this, push the latches that hold it. Now the front of the switch mechanism is available for inspection.

Step 3. It is recommended that you arm yourself with a tester and make sure that there is no power at the switch terminals. If work is carried out with a multi-key device, experienced craftsmen recommend marking with a marker a power wire common to all keys.
Step 4. It is necessary to remove the fastening latches or unscrew the bolts that hold the switch mechanism in the socket.Now you can take on a more detailed inspection and repair of the device.
Old keyboard switches are arranged somewhat differently. On the case of such devices, in front or on one of the side panels, there is a mounting bolt, which you need to unscrew. Then you can remove the entire body of the product.
For old and new switches, different types of socket outlets are used. This point should be considered if you plan to update the device.

Sometimes a too rigid mount interferes with the installation of the keys, then the bolts need to be loosened a bit, this usually helps. During disassembly of the switch, it is not always necessary to remove the key, if it does not interfere with the necessary repairs.
In this case, it is enough to detach only the frame. Spacers can be loosened to the side.
Ends wire strip and fasten to the terminals. To make sure that the work is done correctly, you need to twitch the wires slightly after fixing. Any mechanical defects or damage to the cable is a good reason to replace it.
Places where there is damage to the insulation layer should be re-insulated. But if there are too many such sections, it is better to replace the cable completely, otherwise soon the switch will have to be repaired again.
Upon completion of the repair, the circuit breaker must be correctly connected to the wiring again, observing the diagram and avoiding errors that were made earlier. If wiring has been replaced, unused ground wires must be insulated.
Then you should again lock the switch mechanism in the socket and tighten the fixing bolts. Then, the keys and the decorative frame are returned.

Now you need to check the operation of the switch. To do this, it is turned on and off several times. For two- and three-key devices, each key is checked separately and all at the same time. If the device does not spark, and the lamp light does not flicker, the work can be considered successful.
Our site has a block of articles with a detailed description of connecting one-, two- and three-key switches, we recommend that you read:
- Wiring diagram for a two-gang switch and a step-by-step guide to installing it
- How to choose and correctly connect a three-key switch
- How to connect a switch with one key: rules and connection diagrams
What to do with the rotary switch
Key switches are the most common and simple models. With other variants of such devices, some difficulties may arise. Sometimes you have to fix problems with the so-called rotary switches, also called dimmers.

Such devices are also sensitive to power surges and short circuits, as well as their “brothers” with keys. Very often a triac breaks in dimmers. This item cannot be repaired, but it can be replaced. It is necessary to begin disassembling the rotary switch by removing the adjustment knob.
It is mounted on semicircular elements such as “father-mother” or special slots. It is necessary to hold the switch case with one hand, and with the other, gently, but with effort, pull the handle towards you. You do not need to twist it.
Under the handle there is a fixing lock nut, it also needs to be unscrewed. Sometimes fixing is done with a screw.

Unscrew any of these elements counterclockwise. Now you need to remove the plastic overlay, as well as the frame, if necessary. Then you should loosen the elements that hold the dimmer mechanism inside and you can remove it from the socket.
First you need to check all the contacts, connections and wires, clean the resulting deposits and oxidation, restore the damaged insulation, replace the broken wires, etc.

The damaged triac must be removed and taken to the electrics store to find a new one, exactly the same. The assembly of the repaired device is performed in the reverse order.
As in the case with the key switch, before disassembling, you must disconnect the line, check the contacts with a tester and fix the process in the form of a photo so that nothing is confused during assembly.
Features of repair of touch models
Things get a little more complicated when it comes to touch switcheswhich are turned on not by pressing a key or turning the knob, but by touch.
Such models are usually equipped with a radio remote control, they have not only electromechanical filling, but also boards with microcircuits that provide control of the device.

To repair such a complex device, the skills of a beginner electrician may not be enough. To eliminate complex damage, you will have to invite a master who knows not only electrical engineering, but also electronics.
High-quality touch switches rarely break, but if this happens, you first need to study the manufacturer's instructions to disassemble the touch switch correctly.
First you need to remove the glass decorative plate. Under it there is a panel with one or more sensors, depending on how many lines (one, two or three) this particular model serves.
Typically, the location of the sensors is indicated by circles, as shown on the decorative panel, the area sensitive to touch.

Under the decorative panel there are LEDs that indicate the status of the switch: red - on, blue - off. Under the panel with sensors and boards there is a switch mechanism to which wires are connected.
Dealing with inputs and outputs is pretty simple, much the same as for a regular key switch. The sensor plate is attached to this part with clips. To remove it, you just need to disconnect them.
The main part of the switch, which is installed in the socket, usually does not have any clamps. As fasteners, ordinary bolts are used. To inspect the connection points of the wires, you need to unscrew these bolts and remove the switch from the socket. If the breakdown is related to the wiring, it will not be difficult to fix it.
It is necessary to check the voltage on individual cores, find the faulty wire and replace it. Here, as well as when working with other types of switches, it makes sense to clean the oxidation at the contacts, if any.
Reassembling is not difficult: connect the main unit to the power supply, install it in the socket and fix it there with screws, then attach the panel with sensors and a decorative plate.
The protective mechanisms of such switches respond to breakdowns by interrupting the power supply. Even if the light bulb just blows out, the switch goes into the “off” position, which does not change, even if the lamp is already replaced.
In this case, after repair, you just need to touch the plate to turn on the light. If there are no other failures, the touch switch will work properly.
Repair Recommendations
Contact problems are easily resolved. First they need to be examined. If they have a layer of oxidized metal, it should be removed, and then establish contacts in place.
If the contacts are not just oxidized, but have pronounced signs of fusion, usually they cannot be repaired, the device will have to be completely replaced. It is very simple to remove carbon deposits from the contacts, for this you can use a knife or the end of a flat screwdriver.

When working with wires, you need to pay attention not only to the condition of the bare ends, but also to the quality of the wires themselves. For example, fragile veins can easily break, break, etc. In this case, part of the wiring will have to be replaced.
Among the common causes of weakening and disturbance of contacts are:
- increased humidity, which stimulates oxidative processes;
- Incorrect, for example, too weak wire fastening;
- excessive load, as evidenced by sparking, buzzing, crackling and other similar signs;
- mains voltage exceeding the permissible level;
- frequent voltage drops, etc.
To reduce problems with carbon deposits on the switch contacts, experts recommend using energy saving lightsinstead of traditional incandescent bulbs. The network load is reduced and accessories wear out more slowly.
Conclusions and useful video on the topic
The process of disassembling and repairing a conventional two-key switch is presented in this video:
Here you can get acquainted with the device and the features of disassembling the touch switch:
This video shows the disassembly and device of the rotary switch:
Correct disassembly of the circuit breaker is an important stage in the repair of the device. It is necessary to remember the safety measures, as well as carefully remember or photograph each step of this process, so that the reassembly was also performed without problems.
Have experience disassembling the circuit breaker? Or want to ask questions on the topic? Please comment on the publication and participate in the discussions. The feedback block is located below.
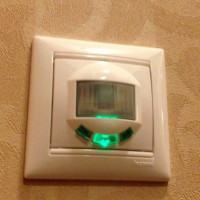 Switch with motion sensor: how to choose and install a light switch with a sensor
 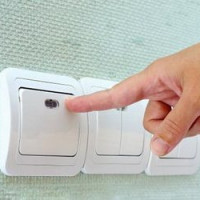 How to install a light switch: step-by-step instructions for connecting typical switches
 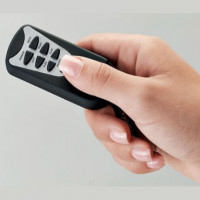 Light switch with remote control: types + overview of TOP brands
 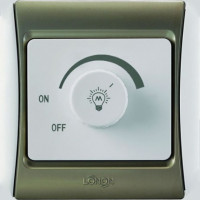 Light switch with dimmer: device, selection criteria and manufacturers review
  Touch light switch: why is it needed, types, marking, selection and connection
 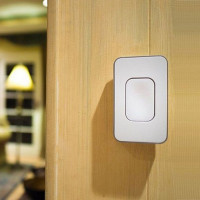 Wireless light switch: selection criteria + review of the best models
  How much does it cost to connect gas to a private house: the price of organizing gas supply
  The best washing machines with dryer: model rating and customer tips
  What is the color temperature of light and the nuances of choosing the temperature of the lamps to suit your needs
  Replacement of a geyser in an apartment: replacement paperwork + basic norms and requirements
Changing the switch is quite simple, well, as for me. And provided that this is the so-called “grandmother's” switch. A bigger problem may be that the new device may not fit in the old slot. Then you have to hollow the wall. And try not to save on the switch. It is better to choose such that its inside is made of heat-resistant materials. This will help to prevent the case from flashing when overloaded or shorted. And most importantly - repair the switch in the daytime if there is no voltage in the network.
Good day, Sergey.I emphasize that the article begins with information on how to organize a safe replacement, how to choose a switch so that the landing dimensions correspond to the old one.
Heat-resistant materials are your fantasy. On the switch or in its passport, the rated current and voltage are specified. If you connect a spotlight of several kilowatts through a room switch, then no heat resistance will help.
Regarding daytime repairs, the cellar, for example, is always dark.
In conclusion: do not give far-fetched, useless advice.
When replacing an old switch, it is better to dismantle it first. And only then go with him to the store, so you will have confidence that you will buy almost the same. But before you go, it is worth insulating the wires so that someone does not accidentally touch his hand. There is another interesting point when the neutral wire is output to the switch. This is not worth doing. It is best to break the phase.
Hello. I am having trouble disassembling a single-key switch from Viko. I plan to insert it into a frame for two switches.
I removed the key without any problems, then pulled out a narrow white frame from the main body. But what to do next and how do I pull out the main plastic case and separate it from the insides of the switch? Inside is some kind of plastic transparent plug, I bent the paws on it, but nevertheless, neither it nor the body lends itself. I’m afraid to pull him hard, I don’t want to break everything. Tormented yesterday all evening, but never found a solution.
Good afternoon, Lena. The impression is that half the question is about dismantling the old switch, and half is about preparing the new one for installation.
In any case, the mechanical part of the switch is located in a plastic case, which can be removed simply by clicking on the top (attached screenshot). I also attached a picture of the result of the “click”. This is followed by a photo demonstrating the “dressing" of wires - the fixing screws are screwed with a screwdriver. This is a general disassembly diagram for all circuit breakers. Of course, there are options - look, think.